The Kleinhorn Part 2
Nelson Pass
Introduction
If you saw part one of this project (AudioXpress, January 2005), you know that the KleinHorn is a big toy, and you can imagine that it’s hard to resist playing with it further. When Chris and Matt built the horns last year, they made different driver chambers and replaceable front baffles, so that it would be easy to try different loudspeaker drivers.
In this part we will first briefly explore some of the effects experienced with different amounts of absorbent stuffing in the horn as presented in Part 1. Then I will describe the effort to add scary deep bottom end by joining it with a previous project, El Pipe-O (AudioXpress, May 2003).
Last, I will try out the larger Lowther DX4 driver, extending its top end with the TAD PTR9 ribbon tweeter, resulting in a loudspeaker that delivers even more efficiency and dynamic range and extends from 20 Hz to as high as 100 KHz, retaining most of the essential charm of the full-range transducer.
Stuffing Issues
When we left off in Part 1, Polyfill was used to acoustically dampen the chamber immediately behind the driver and also the first few feet after the throat. My intention here was to remove some of the high frequencies that got past the initial low pass filter formed by the volume of the box and the inductance of the throat. As the sonic performance was thought good in this regard, I didn’t explore it further at that time, but I did note that we were getting more gain out of the horn than needed compared to the direct radiation of the cone, and had some acoustic margin to explore more damping.
Later, with more time on my hands (ha ha, I make joke!) I undertook the task of putting more absorbent material in the horn and taking a listen. My first effort was to try to lessen the parallel wall reflections from side to side in the mouth forming a ½ standing wave, which for six feet would be at about 90 Hz or so. A divider was made out of acoustic tile and used it to split the last 6 feet back from the mouth into two sections of 3 feet width so that resonant energy would be removed and also shifted up an octave for that part of the horn length.
This approach measurably reduced some resonance in that region, but in actual listening tests, it also took some of the life out of the sound. This was contrary to what I would have expected, but validated by other people’s ears. Since the shape of the panels fit nicely on the sides of the horn also, I tried them out there, but it didn’t help.
Persistence is a very large part of do-it-yourself audio design. I began the more arduous job of taking the top section apart and increasing the amount of Polyfill from the first few feet to about 2/3 of the length from the throat. I didn’t care for the result at all. It took several more hours to remove the extra stuffing, during which I decided that perhaps I had gone in the wrong direction. I ended up taking out all the stuffing except in the chamber before the throat.
The sonic result was considerably improved over that of Part 1. The sound was more dynamic and lively, and I found that my approach of removing delayed higher frequencies from the horn did not improve the tonal balance, coherence, or even the imaging. Thinking about it, the effect is similar to an open baffle operated about 10 feet from the rear wall, and it sounds very spacious – if you like that sort of thing. You may recall my remark in Part 1, in which I described the sound as big? This was bigger.
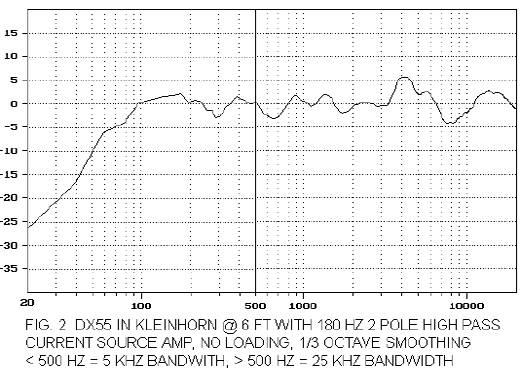
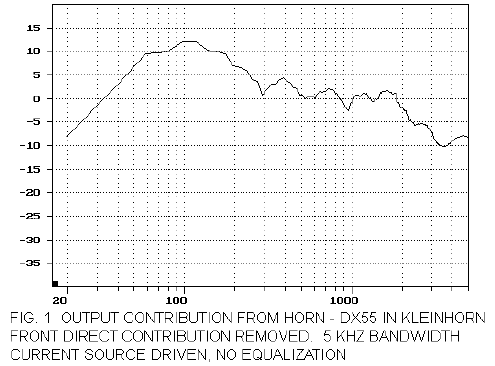
To get more of a picture of the response of the rear wave, I isolated the front wave with a moving blanket, placed a microphone behind the driver box and sampled the output as shown in Figure 1. Here we see that the output of the horn remains significant to several kilohertz. Considering that later I will be removing some of the low frequency peak in this curve, we conclude that the output of the KleinHorn is relatively wide band. Coincidentally, when used with the Lowther DX55 drivers, the increased output of the DX55 above two or three kilohertz nicely picks up the difference and the result is a fairly flat response from about 300 Hz on up with no equalization. You can see this in the curve of Figure 2.
Since rear loaded horns are often used with high efficiency full range drivers, this points to what must be a common effect – the mouth of these horns are putting out a lot of higher frequencies. Measurement of the port output of two samples of “Quarter Wave Tapered Pipes” shows a similar result, although with much less delay. It’s interesting that people don’t seem to complain about this characteristic, but there it is.
Frankenstein Meets the Wolfman
Or more accurately, KleinHorn meets El Pipe-O. You may recall from Part 1 that the response of the DX55 made it down pretty flat to 50 Hz. You would think that such a big piece of hardware would go lower, but horn sizes are inversely proportional to the wavelength, and the physics are merciless. With 30 square feet of mouth per side, we must be content with the efficiency gains within the band-pass of the horn and look elsewhere for subsonics.
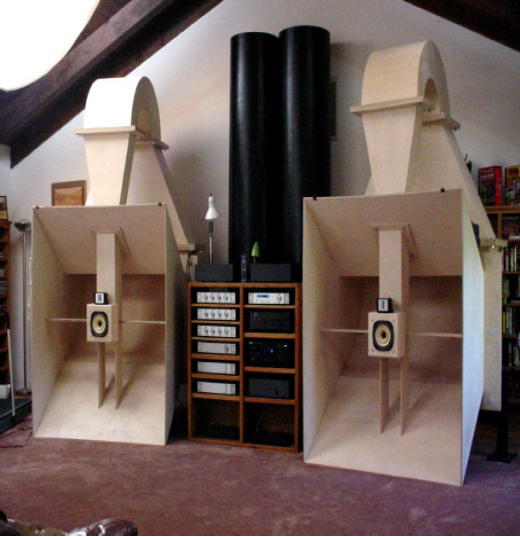
Of course it just so happened that I had a nice set of El Pipe-O’s left over (for some reason I was unable to give them away) and so I hauled them out of storage, painted them a nice spiffy black, and set them between the horns as you see here. This photo, which displays the system with the DX4 drivers and TAD PR-R9 ribbon tweeters described later, was taken on an occasion of unusual neatness in the sound room.
El Pipe-O is basically two big lengths of 24 inch diameter Sonotube with 21 inch woofers at the bottoms and damped with Dacron or Polyfill. They easily go down to 20 Hz, but their transient characteristic is not so good up around 100 Hz, so you can imagine them as an ideal match. Any room that can hold KleinHorns can find some space for El Pipe-O, and the over-the-top approach tends to appeal to the same builder.
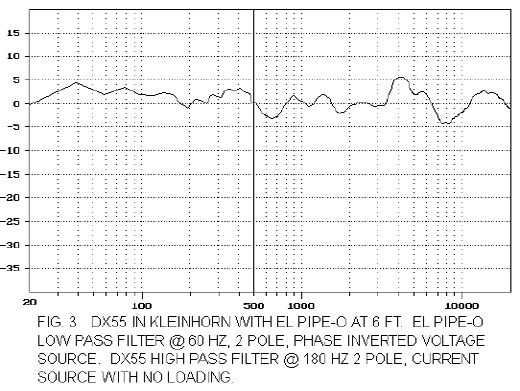
The big trick is to work up a crossover that seamlessly blends El Pipe-O with the DX55’s in the horns. This turned out to not be a trivial job. Using an XVR1 crossover I tried various high and low pass filter settings and amplifiers, measuring and listening with mostly unsatisfactory results. There was usually either a large peak or dip in the crossover region and a couple of settings that measured fairly flat but which didn’t sound right at all.
Once again, invention is 90% perspiration, and an XVR1 is capable of a gazillion filter settings, so I kept on trying things in the belief that something would give me a “sweet spot”. Ultimately I concluded that El Pipe-O did not like to be mated with a current source amplifier as it needed the damping factor to have adequate control, but that the DX55 was happier with a current source. This was just the beginning...
Reverse the Polarity, Igor…..
While I always start with drivers operated electrically in phase, there was no setting I tried which gave me a flat response, and so I ended up inverting the phase to El Pipe-O.
More experimentation gave me filter values that gave the best response, and one turned out to be a 2 pole high pass filter at 180 Hz, which gave the DX55 response seen in Figure 2. Here you see flat response in the horns down to just below 100 Hz, with the 180 Hz filter removing the elevated response around 100 Hz and dramatically reducing cone excursion in the DX55. This reduction of excursion will give us a lot more dynamic range in the system, as the DX55 doesn’t have a lot of available travel in the first place, and is easily driven to distortion at low frequencies and high levels.
The optimal high pass filter for El Pipe-O worked out to be 2 pole (12 dB per octave) at 60 Hz, and the two blended happily as seen in Figure 3. Note in Figure 3 that 1/3 octave smoothing has been applied and that two different sampling bandwidths are used; 5 KHz for the range below 500 Hz, and 25 KHz bandwidth above 500 Hz.
Note also that the measurements for KleinHorns are taken on axis at 6 feet, not at the usual 1 meter. This is because the wave at the mouth at the low end is sufficiently large that you find yourself seeing no bottom end – at 1 meter you are in the region of the horn still defined as high displacement and low pressure. To get a more accurate picture you have to back off at least a ¼ wavelength.
From a listening perspective, this configuration gave the best results yet. The removal of the horn stuffing, some much needed high pass filtering for the DX55’s, and the addition of El Pipe-O on the bottom gave much greater dynamic range and liveliness to a system that was already a show-stopper. Now I can listen to Pirates of the Caribbean much too loudly, and yet it holds its own on critical, delicate material like string quartets and simple vocals. It would be immodest to tell you how good it is.
But are we done here then? Of course not - we always want more.
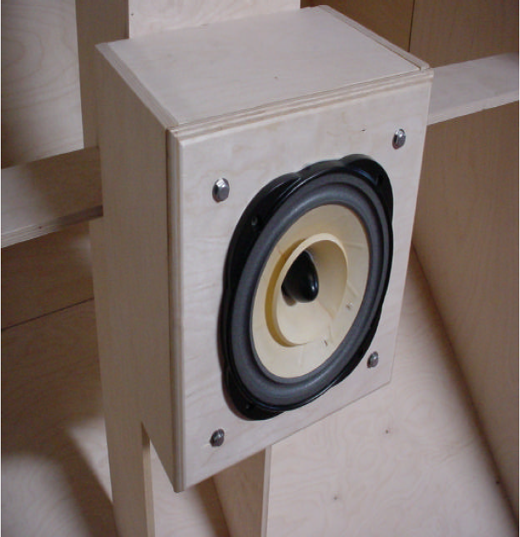
Among the many toys on the shelf were the larger 16 ohm Lowther DX4 drivers, and a nice set of baffles already cut to their size. Also there was a beautiful pair of TAD PTR9 ribbon tweeters, rumored to go beyond 100 KHz.
Sometimes More is More…
The DX4 is similar to its smaller sibling the DX55 and relates closely to previous 8 inch Lowther drivers such as the PM2A, the biggest difference being the Neodymium magnet structure. Many Lowther lovers retain their affection for the PM2A with the Alnico magnet, but having played with both I must say that I prefer the DX4 as having a slightly smoother and more extended top end. Either should work well in this design.
Here’s a picture of the DX4 mounted up in the Kleinhorn:
By virtue of larger radiating surface, the DX4 will deliver more air volume and goes into the bass region with more authority and the DX55, but it pays the price at the high end, where a 10 KHz peak is followed by declining response. If you don’t mind adding a super tweeter to the system, this is easily remedied.
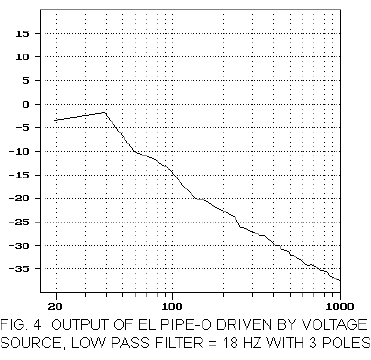
Starting from the bottom end, and after much experimentation, I mated the DX4 to El Pipe-O with a different set of filters than used with the DX55. This time the two driver systems worked well electrically in phase, and given the more robust low frequency response of the DX4 I was able to lower the frequency of the low pass filter for El Pipe- O to the curve of Figure 4.
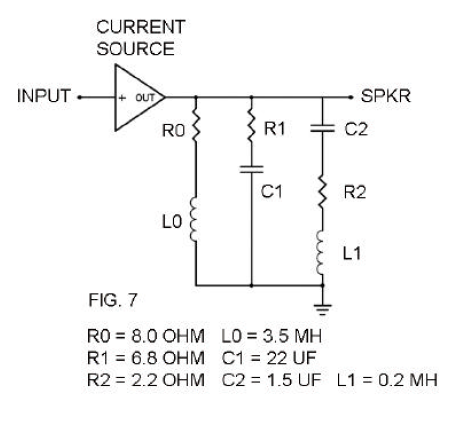
However treating the crossover and equalization of the DX4 turned out to be a bigger task than that of the DX55. Where the DX55 only required some fussing with the electronic crossover values, the DX4 required the addition of passive components loaded in parallel with the output of the current source amplifier I used. These passive loading elements are along the lines of the networks described in “Current Source Amplifiers and Sensitive / Full-Range Drivers” (AudioXpress October 2004). I won’t bore you with the long saga of trial and error that resulted in the network of Figure 7, but suffice it to say that it was a lot of repetitive fooling around, critical listening, and measuring.
Subjectivist Philosopher Meets the Meter Reader
Much of DIY audio is like that – the best results come from the willingness to try out lots of different things and then knowing what you like when you hear it. Measurement tools are a big help, but they won’t do your listening for you. It’s important knowing what you want (lots of people don’t) and preferentially I do my listening before I measure to help avoid being unduly influenced by the meters. If you design for the enjoyment of other listeners as well, it’s a big help if you have good taste. I can’t help you there, but like the man said, “If you want to be an art critic, go look at a million paintings”.
If you only design for your own amusement, then of course you can do whatever pleases you. Personally, I like that approach better.
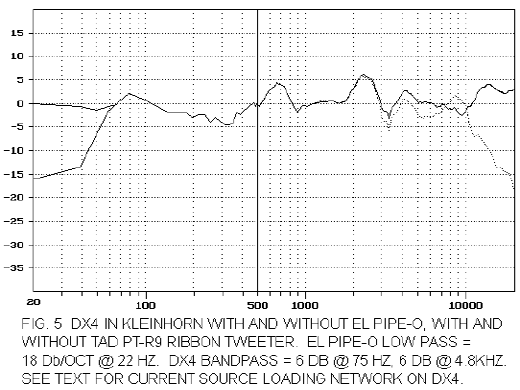
The active band pass filter values for the DX4 that worked best were single pole (6 dB/octave) at 75 Hz and 4.8 KHz. Nice and simple, but achieved by also tailoring the response with a somewhat complex loading network.
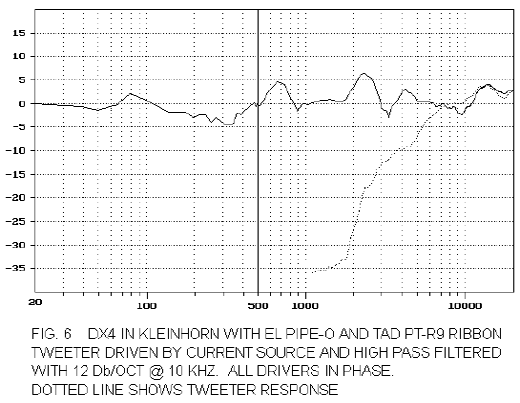
The result is the response curve you see in Figure 5. On the bottom you see the DX4 response with and without El Pipe-O attached. On the top you see the response with and without the TAD PT-R9 ribbon tweeter. Taken 6 feet on axis with the horn, we see the bottom end is flat to 20 Hz. What you don’t see is that it starts falling off below 20 Hz. On the top end you see the tweeter flat to 20 KHz. What you don’t see is it extending out to somewhere around 100 KHz. Since my microphone only goes to 50 KHz and my ears to maybe 20 KHz (then again, maybe not) I trust other authorities on that figure. The dashed line at the top end shows the response of the DX4 without the tweeter, where you can just make out a hint of the peak at 9 KHz that has been taken out by the 4.8 KHz low pass filter and the passive loading network.
Nevertheless we have achieved a good measured response for this system, certainly about as flat as we can expect without hauling out a lot of equalization. I have tried parametric and 1/3 octave active equalization with both of these speakers to see if I could improve upon them, and certainly I have been able to get much flatter response, but I haven’t managed to make them actually sound better – in fact I haven’t found that I like the results as much. This has been the observation of other critical listeners with this system, and the phrase “sucks the life out of the music” has been heard more than once.
Is it the surfeit of op amps in these equalizers or maybe cheap capacitors or even the sharp phase shifts inherent in high Q filters? I don’t know, but is certainly worth some future exploration.
Figure 6 shows the same curve, but isolates the ribbon tweeter, which is driven by a current source and actively crossed over at 12 dB/octave at 10 KHz. You will notice that it doesn’t actually go away until down around 6 KHz, a typical example of why you don’t want to take textbook crossover values too seriously with real world drivers.
The Envelope, Please….
So then, how does the more complex 3 way DX4 system stack up against the 2 way DX55? Well, I would have to say it’s better. Crossing the DX4 and El Pipe-0 over at a lower frequency seems to improve the resolution on the bottom end, and the extension provided by the ribbon tweeter is very, very nice. Certainly the system plays louder yet, if that can be considered a virtue. Having said that, not owning the DX4’s, I ultimately went back to the DX55’s and for the time being continue to like them very much on a day-to-day basis.
I still have a number of pre-cut baffles for different drivers, and intend to play with the Fostex FE166E and FE206E, also the TAD 1201 carbon composite cones with the TAD 4001 compression drivers and Emlar horns, and finally the Tannoy HPD 385’s with the coaxial horn tweeter. No doubt all of these will be fun to try, but I am not contemplating a follow-up article.
After that, this thing being as large as it is, I’m hoping to get an email from an Argentinian cattle baron asking to trade the system for a Lola GT. He can reach me at
nelson@passlabs.com
Copyright 2005, Nelson Pass