Zen Variations 4
A BIG thanks. To Nelson Pass for being so generous in an age obsessed with knowledge hoarding. To Peter Daniel for being to chassis, what NP is to the circuit - a Class A amp, especially, is a nonentity without a proper chassis. To everyone else on diyAudio.com for helping me out (either directly or indirectly): I really consider this as an achievement of the forum that even I could attempt and successfully complete this (my first ever DIY).
A quote from the Zen4 article:
"The amplifier is not very susceptible to noise pickup, and you can get good results enclosing it in a wooden chassis"
After I found out about the amount of tooling required for aluminum-smithery, there was no choice. And, it is good that I used wood because I got into trouble with the other large metal surfaces (heatsinks) - they add their unpleasant character to the listening room (had to resort to putting in some damping material).
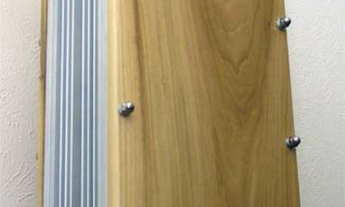
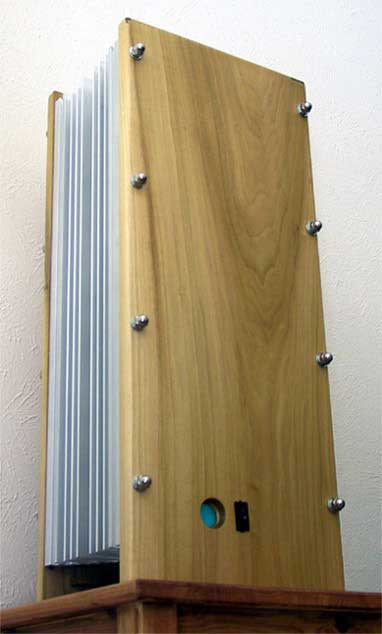
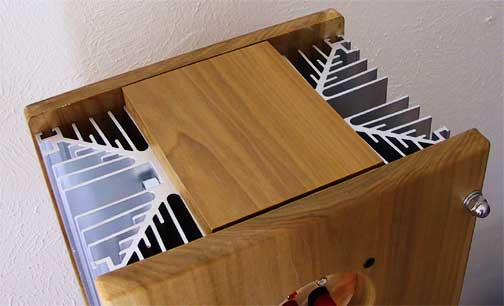
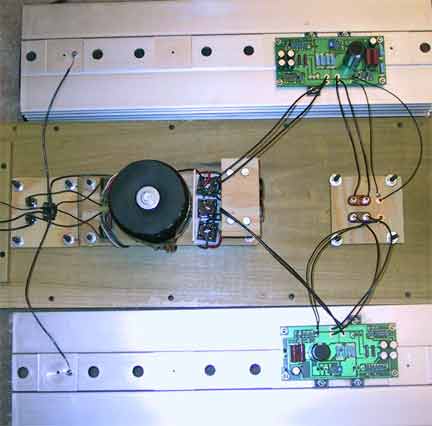
Keeping in line with the Zen philosophy, the chassis is as simple as possible - 2 heatsinks, and 2 wood planks - any simpler and it cannot be (at least not in the 3 dimensional space that we inhabit). I was, initially, hoping to make the wood black. But, after I found out about the effort involved with 'ebonizing' wood (dealing with dyes and other nasty chemicals), I decided to make it as light color as possible. The wood is poplar - no stain. It does look a lot better in real life - a 100K jpeg cannot do justice to density and depth of a better quality wood grain. The top of the amp can be removed - to reveal a... treasure, well actually a handle that allows for easy lifting of this behemoth. I used to wonder, always, while browsing the gallery about how to pick up those heavy-weights (a very tight hug?!)
After resolving the initial set-up problems (ground loop hum, etc.) - oh, what a sound! There are a lot of subtle effects (better resolution, slightly less tight bass - even that, a hum on some live tracks that I never heard before) and they all add up to more realism. And, is that not what this is all about? The amazing thing is that it is impossible to clip this baby (and I define clipping as the woofer getting pushed out, or in, hard as though faced with DC on either John Hammond - Wicked Grin - 2:19 or Gladiator - Battle). On a serious note, it does provide very clean sound even when the volume is at 3 O'clock. Actually there is a strange musicality at those levels (when I was expecting a higher distortion). Makes me understand the attraction on low power tube amps (High 2nd harmonic distortion?).
The power is more than enough for music, but feels a bit anemic for movies (DVDs). The sinks are running pretty hot (uncomfortable to touch), though not so hot that you cannot touch them. Here is a quote from the A75 article:
"and we have made it a rule of thumb not to exceed 55°C on a heatsink. Human skin has the remarkable characteristic that we think 40° is comfortable, 45° is hot, 50° is very hot, and 55° is untouchable. This expanded temperature sensitivity has a lot to do with injury prevention, and is also very convenient for judging whether or not heatsinking is adequate. If you can't touch it, it's too hot."
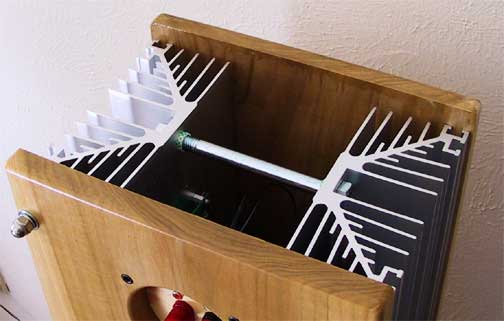
The bottom of the heatsink is cooler than the top - intended for airflow, and also if bias needs to be increased it can be done by pulling one of the MOSFETs out of the PCB and away from the rest for better heat distribution and dissipation.
Used heatsinks are from MECI. PCBs and Q-pack are from Pass DIY. Transformers are Plitron. Other electrical components are from Digi-Key. Hardware is from local HD. Since this was my first DIY, I had to buy all the tools:
Router: Cutting/finishing wood $60 (Yes, router can cut wood too!).
Various router bits $60 (Oh yeah, they are expensive).
Palm sander $20 (Saves a lot of manual effort. A belt sander while being more effective needs more skill - can take significant amount of material in no time, destroying your workpeice).
Drill Press: Drilling (offcourse), cutting circles, and tapping $100 (Tapping, the most frustrating exercise otherwise, is made very easy by a drill press - clamp the work piece, mount the tapping bit, and move chuck by pulling on the drive belt - when unplugged).
Various drill bits, circle cutter $50
Soldering station $100 (A good soldering tool saves a lot of hassle).
Multimeter $40 (opinions vary but for a project like this, anything will do).