Miscellaneous Projects
About me
I've been an audio nut for the last 15 years and have always designed and built (or in the case of the A75 mostly just built) my own equipment, and latterly equipment for friends. After leaving university I worked for a smallish pro-audio company for three years designing microphone amplifiers, compressors, parametric equalisers etc. for recording studios before moving into telecommunications. I now just have audio as a hobby again and design effects units for a couple of bands I know ...as well as the amplifiers, speakers etc...
There are lots of DIY designs out there so why did I pick the A75 to build? Its not my first DIY amplifier. The first 'real' amplifier I made was a design from a French magazine. This used an interesting National Semiconductor op-amp that could take +/- 35V rails but was never the less a small (current) signal device. It differed from the ones I have found in current catalogues because it also had a reasonable slew rate. This drove a single ended output stage, CFP, and the constant current source made from a parallel pair of LM317HVK high voltage voltage regulators in a novel configuration. This amp is great – as far as it goes. If you have speakers that are an easy 8 ohm load without too many dips and have good efficiency ( >90dB/1W/1m) then their 30W power limit can be realised and they sound great. However if you have a difficult load, inefficient speakers and life is loud then they may not be your best choice - bring on the A75.
First, thank you to Mr. Pass for his kind email correspondence regarding the A75 with me. Its not often you get the opportunity to question the designer on DIY projects such as this.
When building a DIY amplifier the chance of hearing it first is more or less zero so it could be regarded as a bit of a gamble. Each pair of mono-block constructed A75's I made cost about UK£1200 in parts and a large time investment so its important to feel that you have a reasonable chance of hitting the target.
I have taken quite a long time to post this material. This was because between 101 other projects I made a second pair of A75s for a friend.
My A75s performance
Bench tests
I have built up quite a reasonable lab (for an hobbiest) including an Neutrik TP401 audio test set (not as good as an AP but more than reasonable for most things), home built speaker test load (fan cooled box with resistors, capacitors and inductors to simulate all kinds of loudspeaker impedances), Earthworks measurement microphone, and so on and so I've been able to evaluate things on the bench as well as by ear.
If you read the audio press and surf the www you will find that almost everyone says that their amplifier is the best for some reason or another. This is often backed up by measurements taken in ways so as to make the amp look good, very dubious scientific principals (can someone please give me a logical scientific reason for a lump of copper wire being "directional" and detail an experiment to show the phenomenon), or sometimes nothing better than the designers say so. Please feel free to judge my comments and tests for what you feel they are worth.
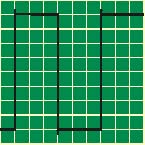
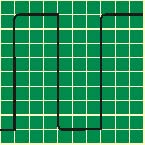
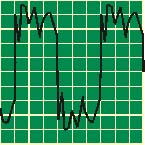
10kHz Square wave test
The most interesting thing about this was how the three amps (see subjective tests) performed. Sadly my oscilloscope is only a basic 20MHz toy and screen dumps are a facility the manufacturers left off so I've done some rough drawings. Into an 8R resistive load all three amps were fine. However the interesting bit is when you simulate a real loudspeaker load. This was a 5R5 resistor in series with a 12mH choke + 18R resistor + 400uF capacitor placed in parallel.
With the A75 there is a slight overshoot at the end or the rising and falling edges. The distortion is shown bigger that life on the drawing a75sq.jpg
With the French design there is a slight rounding at the end or the rising and falling edges. The distortion is shown bigger that life on the drawing a75-p5pfsq.jpg.
With the commercial Japanese design there is some what looks like ringing, much worse than the two class A amps. The distortion is shown bigger that life on the drawing a75-p5-jsq.jpg but it was about 5 times the amplitude of the A75s overshoot maximum. It also looked bad with an electrostatic load simulation, 10uH in series with 2uF + 15R placed in parallel. The A75 and French amp were not affected by this load but my bet is the French design would soon run out of current driving an electrostatic for real as it is single ended.
Sine wave tests
The frequency response of the A75 was –1dB at 10Hz / 157kHz and –2.5dB at 300kHz (the limit of the TP401 testset). Unbalanced and balanced configurations were the same. THD+N was measured at:
0.006% at 1kHz, 0.006% at 10kHz @ 2V RMS output (mostly noise)
0.003% at 1kHz, 0.007% at 10kHz @ 5V RMS output
0.010% at 1kHz, 0.02% at 10kHz @ 15V RMS output (mostly 2nd harmonic with a little 3rd)
0.07% at 10kHz @ 25V RMS output (mostly 2nd and 3rd harmonic)
These tests were done with the 5R5 resistor in series with a 12mH choke + 18R resistor + 400uF capacitor in parallel load.
The frequency response of the French design was -0.5dB at 10Hz, -1dB at 51kHz and –3dB at 78kHz. THD was in the noise <0.002% at 1kHz and 0.01% of what looked like pure 2nd harmonic). For some reason I didn't note the amplitude. These tests were done with the 5R5 resistor in series with a 12mH choke + 18R resistor + 400uF capacitor in parallel load.
The frequency response of the Japanese commercial design was more or less flat from 10Hz to 300kHz, the limits of the TP401, quite a surprise. One side of the amp was giving classic crossover distortion about 0.5% THD with 500kHz bandwidth and 0.1% with a 22kHz low pass filter in place. I think this is because the amp was fixed by a shop at one stage in its life and had its o/p stage replaced on one side. I will re-bias it correctly at some point... On the other good side THD+N was 0.025% at 1kHz into an 8R resistor. However into the 5R5 resistor in series with a 12mH choke + 18R resistor + 400uF capacitor in parallel load this went up to between 0.15% and 0.2% of various harmonics! Oddly, with the electrostatic load simulation it was not too bad even though the square wave test looked bad. Some phase shifting perhaps?
The basic upshot of these tests was that the two class A designs worked well into all loads where as the Japanese commercial design was not so good and went pear shaped into real loads.
Subjective tests
Hi-Fi test equipment
In order to subjectively review the A75s we collected together:
CD: Marantz CD60SE, a Rotel player, Panasonic (upside down CD type)
Pre-amp: Home made design using a pair of Burr-Brown OPA604 opamps to buffer the signal before the volume pot and Burr-Brown opamps in conjunction with
BUF634 unity gain buffer ICs (wrapped up in the feedback loop) to drive the balanced output. Also tried with OP27 opamps.
DAC+pre-amp: in addition to the CD / DVD internal DACs plus pre-amp a home built DAC with MDAC volume control and BUF634 output stage was also tested.
The main reference speakers are home made 'studio' monitor, 4'6" by 1'6" by 2', 245lbs per cabinet, Focal drivers: AudioM 15" woofer, 7" mid unit and TiO2 inverted dome tweeter.
Other more modest speakers we tested with are a pair of Celestion SL6 and at the bottom of the heap a pair of Eltax two way speakers.
French 35 Watt single ended class A design
150W Japanese amplifier from a reputable manufacturer
Results
For details of the folded cascode listening tests see later on in the text – this make quite a difference.
The A75s and the French design are in a different world to the Japanese design which sounds like a normal amp.
The A75 has better bottom octave bass (<50Hz) than the French design (which has a 6800uF output capacitor which could be the reason for this) and (obviously) loads more grunt. Great for some pipe organ music I have. It really took hold of the bass units. During evaluation there was a nasty buzz but this was found to be part of my house and now has some carpet underlay stuffed in it.
The A75 amps are clean and very controlled. You can have a big bass slam at the same time as mid and upper frequency information and it holds it all together.
The A75s are slightly less clinical that the French design although this is more of a different signature than a plus or minus.
The A75s sound better when run balanced as opposed to unbalanced. However if you run them balanced they work better if your preamp can drive them well. The normal NE5534 / NE5532 opamps or better still (to my ear) OPA604 / OPA2604 can drive a 600R load but some bigger boots such as a transistor buffer or in my case BUF634 driver chip sound better.
Design notes on my A75s
Lag compensation
C9 and C10 were set at 15pF. The amplifier did not require C9 and C10 to be fitted for stability but a 10kHz square wave response was the best with 15pF fitted.
Global feedback R81
This was fitted as a zero ohm link in order to provide 100% global feedback. This was chosen for two reasons.
First, past experience the French design. This design was a single ended class A design and there were three published versions with different output stages; a MOSFET with zero global feedback, a BJT with zero global feedback, and a BJT complementary feedback pair with full global feedback. Experiments with this showed the latter to be, in my opinion, much the best.
Second, without global feedback I am not sure how bad any drift in output DC would be. One possibility if DC is a problem would be to have a low pass T filter in place of R81 just to feedback VLF & DC but this is not something I have given any thought to and I guess its not really a problem as Mr. Pass does not mention it.
Folded cascode
In the design notes it says R21 & R22 set the folded cascode level and can be from 100R, full folded cascode to open circuit with no folded cascode. Looking at the value of R1 & R6 which are 2k2 and the middle value of the trimmers, about 2k5, the first value tried was 470R as a sort of middle value. This gave a 'sonic signature' similar to some low feedback valve amps I have heard. Very good for vocals and simply structured music with a sort of rose tinted glasses view of the world (sorry to be so unscientific in my description here). If your into jazz then this may be a nice setting. However to be picky, it may get slightly tiring after a while. Its not brilliant for metal, rock or complex classical music which tends to sound a bit muddled and woolly. The next setting was with the resistors open circuit i.e. no folded cascode, maximum open loop gain, maximum feedback. This seemed to be much better for complex music and was the setting we locked on to as the best, for us at least.
FET matching
Matching the FETs was tricky for thermal reasons because when you switch on the matching circuit they warm up. I used a stopwatch and waited for exactly one minute of warm up then took the measurement. I did this for the output FETs too.
On the first pair of amps I used IRF110 and IRF9110 input FETs and on the second pair I used IRF120 and IRF9120 as I could not get the IRF110 and IRF9110 easily. I got 25 of each in order to be able to pick a couple of good pairs. As it happened this was lucky as with the first pair I made a stupid mistake and killed two pairs. Thankfully I still had enough A1 pairs. For the second amps I found that the IRF120s yielded quite a few good pairs but the IRF9120s were not so good. The pairs were OK but not perfect down to the last digit on the multimeter.
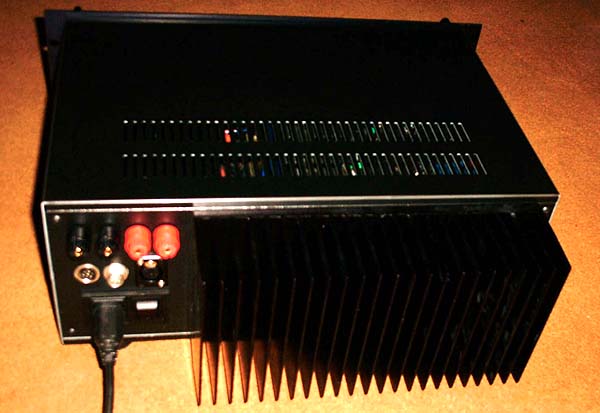
Pickup
Even though the amps were grounded correctly the transformer / bridge rectifier / capacitor power supply still managed to induce spikes at 100Hz (mains is 50Hz in the UK) onto the ground. If you look at the amps you will see that the cables are tie-wrapped in what looks like a slightly untidy fashion. This was to cancel the pickup. In the end the output noise was about –81dBu with a 400Hz high pass filter plus 22kHz low pass filter and about –79dBu with a 22Hz high pass filter plus 22kHz low pass filter. I tried rotating the transformer but it didn't help much but if you dangled a ground wire close to the transformer the buzz went through the roof. The best bet may be a mu-metal can for the transformer. In the event the tiny amount that is left can not be heard even if you put your ear to the speaker, just a quiet hiss.
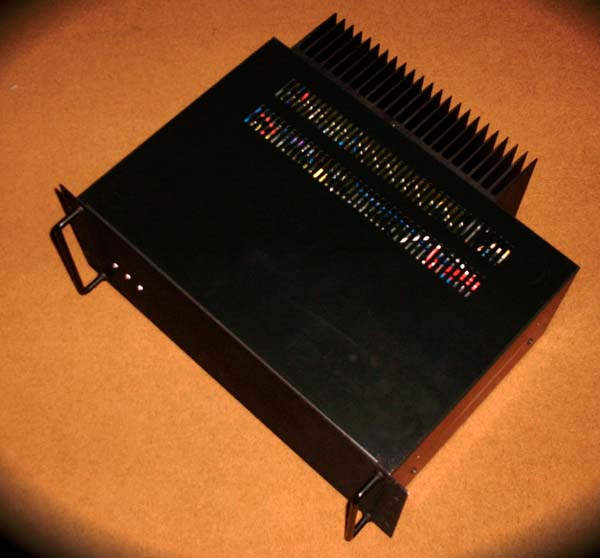
Monoblock construction
The amplifier PCBs were re-designed and the amps were constructed as a monoblock design. This was primarily to facilitate enough heatsinking to avoid the need for a fan. It also meant that the power supplies were dedicated to one channel and so left – right modulation of the signal would have to find its way via the main ring main.
Power supply Protection
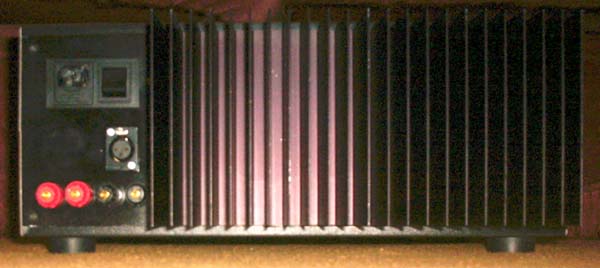
For various reasons, because the end aim is to have the amplifier remotely controlled via a bus (similar to I²C), see photo of the read of the second pair of amps, the PSU was changed a little for switch on and no longer uses a triac. Instead the soft-start current inrush is suppressed by using a power resistor and a relay. Also in line with this and physically mounted to the power resistor is a thermal fuse in case the relay fails and the soft start resistor is not switched out.
Note: remember to put a diode across the relay coil otherwise when switched off it can make a 100 Volt pop and possibly fry the transistor driving it.
Mains RF & spike protection. Three 275VAC MOV devices were fitted to the input between live-neutral, live-earth and neutral-earth. Also X and Y capacitors and a CMC were fitted to help filter any conducted RF interference.
Thermal switch on heatsink. In line with the mains is an 80°C thermal switch was mounted to the heatsink so should a fault occur that does not blow the fuse, the amp has a safety cut-out. This switch has quite a large hysteresis so the amp will not try to come on until the temperature has dropped.
Bridge rectifier capacitor diodes. I placed 100nF polyester capacitors across all of the bridge rectifier diodes to try and squash switching noise a bit.
Input stage DC block
Back to back 330uF 6.3V Sanyo Os-Con capacitors were used to block any DC from the source. This was required as if a typical opamp has up to 10mV DC offset and this is amplified by the power amp it could represent something getting on for a DC fault. The situation is worse if the amp is being driven by a balanced source which has non common mode DC offset (e.g. 10mV on the live signal and -10mV on the return signal).
Over voltage protection and ESD protection
Each channel used four diodes were used for this; 2 x 1N4148 and 2 x 3V3 zenners. The 1N4148 were used in line with the zenners giving two diodes in series with a clamping voltage of about +/-4 Volts. The 1N4148 were used in series with the zenners to make sure there was no possibility of any distortion due to diode leakage. This is probably overkill and two back to back 3V3 zenners would almost certainly be OK but its only two diodes so 'why not'.
I had considered using TranZorb type devices but I do not know if they world leak and effect the audio. Hopefully the 4148+zenners are OK. If you use the standard A75 PCBs you could add this on a bit of stripboard.
Note: I apologise to those of you who know about ESD... I really recommend some sort of static protection. If you are going to build these amps buy an anti-static work mat, wrist strap and any other bits you need to provide proper ESD (electrostatic discharge) protection. It is a very worthwhile £40. I have learnt this is important. Even if you don't blow a FET up it is possible to damage it, then your amp may fail later on or when you think its finished and working fine.
Unconnected input, unbalanced mode stability resistor added
One problem that was found was that when the amp was configured in unbalanced mode it oscillated if the input was left unconnected. To solve this a 10k resistor was added between the live signal and return signal pins (on the pre-amp side of the input DC blocking capacitors). This stabilised things 100%.
Addition of resistors to balance input FETs
Just in case the input FETs could not be matched well enough 4 extra resistors were added to the circuit and a selection of low value resistors were purchased to trim the devices. In the event 25 of each of the input FETs were bought and there was no problem in getting several matched sets.
Copper thermal bridges on input FETs
During testing of the first pair I found that the DC offset could drift out by quite a bit if one input FET of a pair got hotter / colder than the other for any reason. To cure this I glued a small piece of copper sheet to the top of each of the pairs with epoxy glue. This seemed to cure the problem.
Loudspeaker Protection - K4700 Loudspeaker Protection Kit, Velleman
This is a cheap kit (about £20) used for loudspeaker protection and was bought for convenience i.e. one less PCB to make etc. It provides a 6 second delay after switch on to avoid any thump as the amp comes up and as soon as the amplifier is switched off it disconnects the speakers to prevent any switch off thump. It also provides DC protection disconnecting the speakers if the DC is more than about 700mV. It is actually a stereo kit so the output relays were wired in parallel as the amps are monoblocks.
Just as a note, I think there is a slight design flaw in this kit. There are two LEDs – a yellow one for the speaker switch on delay and a red one for DC fault. I replaced the normal LEDs with clear ones (just because they looked nice) and found that even when the speaker had switched in the yellow LED was on dim. If you look at the circuit the reason why is obvious. The base of T3 which drives the LED is pulled down by T4 when the speaker is switched in. T4 is a darlington so the base of T3 only ever gets to about 1V not the 0.6V or so needed to fully turn it off. The problem was fixed by adding a 3V3 zenner between R17 (the base driving resistor) and the base.
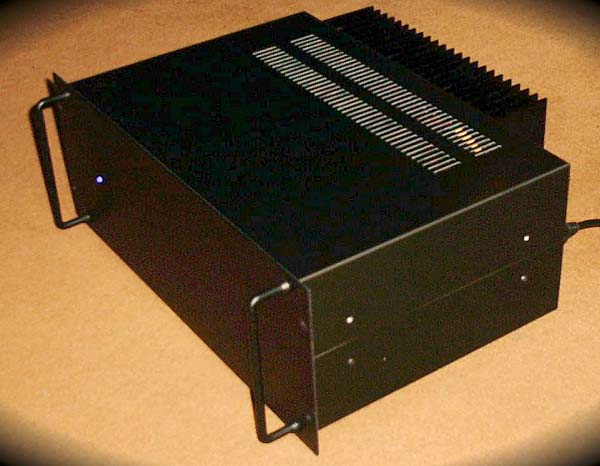
As you can see, with the second pair there is just one LED instead of three. This is an RGB LED which shows green for start-up wait, blue for active and red for fault.
Components
Obviously, when your making an amplifier such as the A75 your not going to penny pinch on components. After scouring the catalogues the components I ended up choosing were:
Capacitors
I'm not sure how much the quality of the capacitors will affect the overall sound. However in my years making audio circuits I have measured distortion from poor quality electrolytics. This looks mostly like 3rd harmonic and goes up with decreasing frequency. Also some ceramic dielectrics are ghastly (Z5U, Y5V, 2F4...). My basic rule of thumb is that the more Farads and the more Volts a capacitor is capable of for a given physical volume the more likely it is to sound nasty. I'm sure this is by no means a hard fact, just a rough observation.
Voltage amplifier PCB Capacitors
330uF 6V3 Sanyo Os-Con Capacitor (for input DC block)
These were used for the input caps as here is a place where distortion could be added. A pair were used back to back to give a 165uF bipolar.
47uF 16V Sanyo Os-Con Capacitor
These were used as for good high frequency decoupling of the 9V1 zenners and to bypass the Q11 bias circuit. I doubt their audio quality is needed to bypass the zenners (what does it matter if you distort something your shorting) but it will make sure that the diodes are well shorted up to a goodly high frequency. The audio quality of C7 may be of importance.
220uF 16V Rubycon ZA Series
These were used for the folded cascode experimentation. An Os-Con was not available in the required voltage and capacitance so a Rubycon ZA Series was used, itself a top notch component. As the capacitor is used in series with a resistor, ultra low ESR may not be needed but it is very much in the audio path. In the event these components were not needed as myself and friends all agree that the amps sound better with no folded cascode.
Voltage doubler PCB Capacitors
Panasonic FC Series 470uF 100V
Nothing to much to note – just a good quality component.
Elna RJH series 120uF 63V
An ultra low ESR component was used on the output of the voltage doubler circuit to try and provide good high frequency decoupling.
Reservoir Capacitors
Elna Cerafine 10000uF 80V (x 8 per monoblock) (first pair of amplifiers)
BC Components 114/115 series 33000uF 63V (x6 per monoblock) (second pair of amplifiers)
If you are going to make a design using many parallel reservoir capacitors, construction using screw terminal capacitors is rather more 'professional' than using solder tab devices. Unfortunately the Elna Cerafine And Nichicon Super-Through capacitors designed 'for audio' only have tabs.
For what its worth, we can not hear any difference between the 2 banks of 40,000uF 80V (10,000*4) Cerafine capacitors used in each of the first pair of amplifiers and 2 x 99,000uF 63V (33,000*3) BC components top of the range computer grade capacitors used in each of the second pair. The amps are never worked hard enough to use the extra capacitance.
I made the bus bars from 3mm thick copper bar which after drilling I cleaned using HCl acid (available in dilute form in the UK if you buy the right sort of toilet cleaner) to get the oxide off then used PCB tin-plate solution to protect them with tin. I mention this because I was rather pleased with the result.
Ceramic Capacitors
Silver Mica 15pF & 39pF
Poly Capacitors
Vishay MKT1813 series polypropylene 630VDC 150NF used in the amplifier output network.
Standard X & Y polypropylene mains filtering capacitors
Resistors
The output FET balancing resistors are 1R0 5W non-inductive planar. This is a hang over from a previous design which needed 1R0 5W low inductance resistors for high frequency stability reasons. As Mr. Pass makes no mention of it I guess this is not a factor in this amp and wire wound could equally well be used.
Other 3W resistors (standard metal oxide 5%)
Transformer
This was a potted (so it didn't buzz) 500VA component. It was mounted using a 'aero' nut so it didn't come loose. I didn't use a nylon lock nut as I don't know how they react to a hot transformer i.e. do they go soft (in the event the transformer only gets slightly warm). Actually that's not true – I used an aero nut because I could just buy a couple rather than a box of 100 but its a possible point if your transformer is less overrated and is going to get hot. The transformer was mounted to the 6mm sheet aluminium base plate with a neoprene type mat under it made from pealing the grippy bit of the bottom of some mouse mats I bought for £0.50 each – bargain.
Transistors
Output transistors were IRF540 and IRF9540 otherwise basically as per the original schematics.
Thermal
Main heatsink, EA extrusion anodised matt black, 150mm length from Redpoint about £30 + tax
TO220 thermal pads SIL-PAD 2000 TO220
Voltage doubler heatsink
Class AB
One point worth noting is that our increase in PSU (500VA transformer and about 100,000uF capacitance has dragged the rail voltage up to about +/-50V. Partly this is a UK problem where the transformer has a '230V' European primary and the UK has a '240V' mains.
The upshot was a output swing of +/-45V on the output = about 125W RMS not 75W as the amps are designed for - remember that the input stage is regulated to +/-50V (in our case it turned out to be about 51.5V) so more Volts on the output stage would be unusable.
Also our heatsinking (non-fan assisted) meant that in a 20°C room we could bias for 75W class A. However, if the room got to 30°C this would be a bit questionable as not only do you have 10°C less delta to play with but the bias drifts up with temperature. As far as I can tell its not unstable i.e. does not exhibit thermal runaway, but it will settle at a higher level. At 30°C ambient the heatsink was at 64°C and at 20°C ambient it was at about 49°C. For the second set this boiled down to getting about 40W class A and the other 85W in class AB at 20°C ambient.
As England does not often get to 30°C experiments of this nature were done sweating profusely in the lab standing about in boxers with a fan heater and a number of thermometers.
Picture inadmissible.
OK so now the amp is not pure class A but in my case with speakers of 93.5dB/1W/1m by the time I get to 40W power out I'm not too worried – its only about 5dB from clip [ xdB=10log(125/40) ]. The point is even when pushed into AB nothing nasty happens and in my view its a better compromise than a fan grinding away in the background.
Doing it again I would have made my own case from scratch rather than using a 4U case and I would have used a heatsink that was 6+ U high so I could bias for full class A into 8R. For those hundred people that want to class A drive into 1 ohm my only idea to avoid a fan is to link it into the heating system and use water cooling. This is possibly highly dangerous but would supply copious quantities of bath water.
Mistakes I made
I seem to have a problem with trimmers.
The first pair
Single turn trimmers. Having single turn trimmers turned out to make setting the amp up spot on quite tricky so for the next pair I used 25-turn which were much easier.
The second pair
Access to trimmers. This time I made it almost impossible to get to the trimmers – doh. I had to set the amps up with the back at a slight angle and attach the outside of an old pen to my trim tool with tape to make it go round corners.
Casework
As mentioned before, doing it again I would have made my own case from scratch rather than using a 4U case and I would have used a heatsink that was 6+ U high so I could bias for full class A into 8R.
Design grumbles
Not many. Its hard to set up and if you don't use a fan and therefore have a larger thermal delta than the published configuration. This means the bias has quite a large change, hence my tests with the fan heater. The heatsink is at about 50°C normally which isn't crazy hot.
Also, I think as a result of the thermal drift DC offset voltage is about (on the second pair of amps) –30mV when stone cold and +20mV when up to temperature in a hot room. The first pair seemed better in this respect. I don't know if this was down to luck or if it was because on the first pair I used IRF110 and IRF9110 where as on the second pair I used IRF120 and IRF9120 and / or the matching was not quite so good.
Open amp key
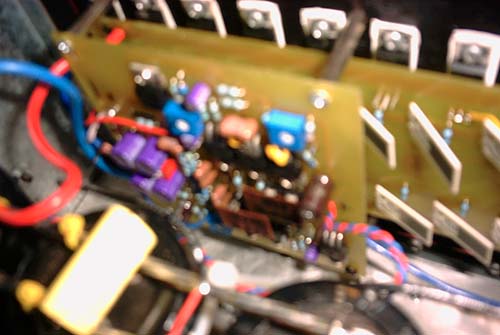
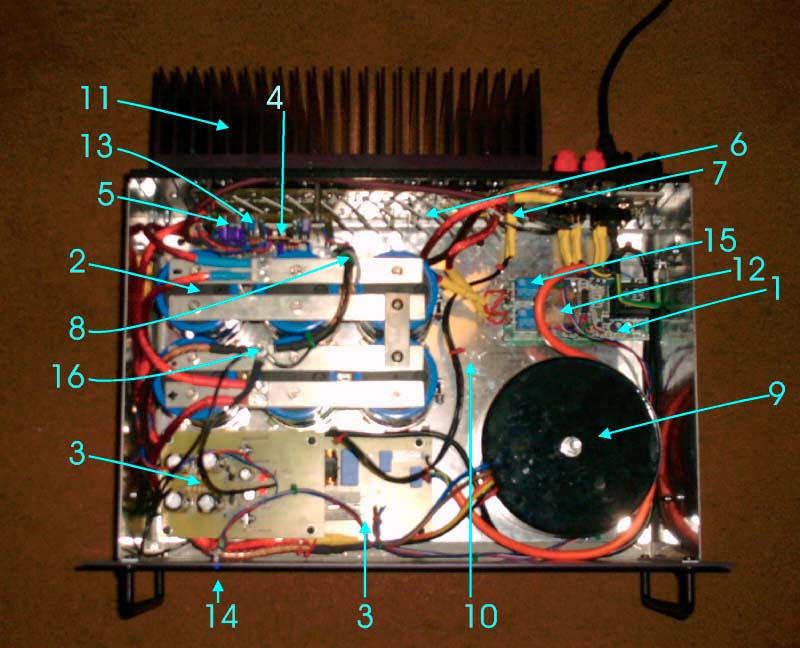
This amp is one from the second pair (as you can tell by the bus bars on the capacitors) a75-p5-f7.jpg
1 Output delay and DC protection kit
2 Capacitors and bus bars
3 Voltage doubler PCB
4 Input transistor copper thermal coupler
5 Input PCB, arrow points to input capacitors
6 Output PCB, arrow points to a 1R planar resistor
7 80°C thermal switch
8 Tie-wrapping to minimise pickup from transformer
9 Transformer
10 6mm aluminium base plate (used to strengthen box and make assembly easier
11 Main heatsink
12 Little additional board to Output delay and DC protection kit to operate the RGB LED
13 Trimmer on voltage amp PCB – try and get to the other two...
14 RGB LED
15 Output relay, both relays are paired together
16 Star ground